
how to SHARE FILES FOLDERS OR DRIVES BETWEEN HOST AND HYPER-V VIRTUAL MACHINE – 2 tips
This article is about how to SHARE FILES FOLDERS OR DRIVES BETWEEN HOST AND HYPER-V VIRTUAL MACHINE. Folders and shared drives are useful for exchanging files between different machines. We will provide information about sharing files, folders, and drives between host machines in Hyper-V.
how to SHARE FILES FOLDERS OR DRIVES BETWEEN HOST AND HYPER-V VIRTUAL MACHINE
With these steps, you can easily copy and paste files from host OS to guest OS and vice versa.
- Method 1: Share the drive using Virtual Machine Connection
- Method 2: Share files, folders or drives on the network
Virtual Machine Connection (VMConnect) allows you to use your computer’s local resources in a virtual machine.
Enhanced session mode allows file transfer between virtual machines via clipboard copy and paste functionality.
To share files properly, you must do the following:
- Ensure that session mode settings are enabled on the Hyper-V host.
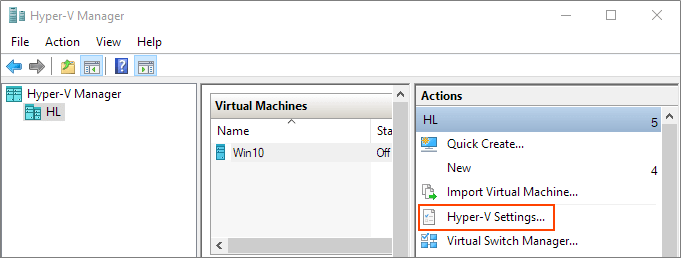
Start Hyper-V Manager, and in the Actions section, select “Hyper-V Settings”.
Make sure session mode is enabled in the server domain.
Next, make sure that the updated session status is in the user domain.
Support and use the updated session mode
- Enable Hyper-V guest services for your virtual machine
Right-click on the virtual machine > Settings.
Select Additional Services in the lower left corner of the menu.
Check Guest Services and click OK.
Support guest services
Steps to share devices with Hyper-v machine:
Step 1: Start the virtual machine and click Show option in the popup window.
Connect to a virtual machine
Step 2: Check local resources.
Then select the “More…” menu.
click again
Step 3: From here you can select the device to share. Removable disks are especially useful for file sharing.
Select the device you want to use
Step 4: Choose to save my settings for future connections to this virtual machine. save the settings for future connections to this virtual machine
Step 5: Click Connect.
Sharing the drive is now complete, and you will see the shared drive in this PC > Network Places section of Windows Explorer after using the updated session mode to connect to the virtual machine.
You will now be able to copy files from a physical machine and paste them into a virtual machine, and vice versa.
Drives are shared from local resources
How can I check if you are running in enhanced session mode
You can check your connection status using the enhanced session status icon at the top of the Virtual Machine Connect (VMConnect) tool.
This button also allows you to switch between basic and enhanced session modes.
Switch between basic and advanced session modes
In the Windows operating system, files and folders can be shared over the network, allowing desktops and laptops to access information without accessing the computer.
For example, users can share a document or an entire video folder, anyone else can open the files, edit and save them, or even delete them if permission allows.
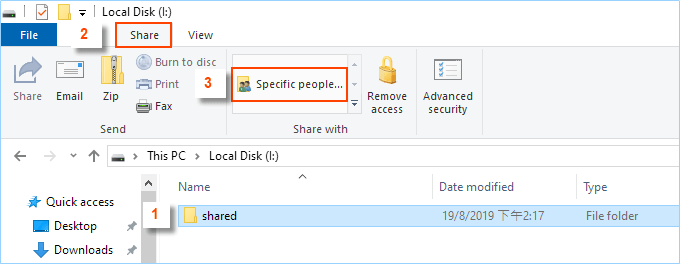
Open File Explorer, select a folder, select the Share tab.
Then, in the Share section, select Specific people.
Share a safe group with people
Select the users or groups you want to communicate with.
Share folders with anyone
Configure permission levels.
Windows computers provide two basic levels of file sharing:
- Read: The recipient can open the file and view its contents but cannot edit the file without creating a different group.
- Read/Write: The recipient can view and edit the contents of the file and save (overwrite) the file in its current location.
Here we choose read/write.
Then, click on the “Share” button.
Shared permissions: read and write access
Then click Done.
Your file is shared.
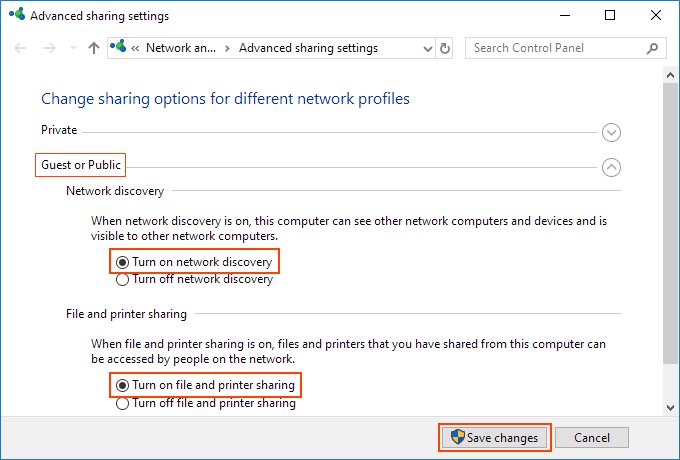
Note: To share files over a network, you must enable network discovery and file sharing for your host operating systems and hosts.
You can do them from the Advanced Sharing Settings page or from the Network window.
Advanced sharing settings
In the virtual machine, open a file browser, go to the network and you will see an error message (“Network detection is disabled…”), you need to enable network detection and check the devices that share files on the network.
To do so, click “Disable network discovery…” and select Enable network discovery and file sharing.
Support network discovery and file sharing
Disk sharing is now complete and you can view the shared disk in the “This PC” > “Network Places” section of Windows Explorer.
You will be able to easily transfer files between these two systems.
You may also like

How to change the voice on any iPhone for Siri or voiceover
Don’t like the sound your iPhone is using? Good news, you can change it. And as much as I hate

How To Grow Educational YouTube Channel and Make online Money – a simple guide
This article is about how To Grow Educational YouTube Channel and Make online Money . Do you have an

5 top benefits of project management today
Project management sounds like a very general term, which is almost self explanatory. Frankly, on th